Thursday 22 August 2013

The first Wooffers

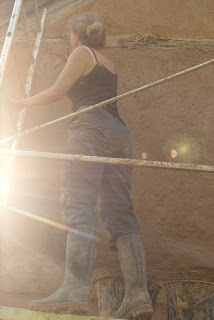
Yesterday I welcomed my first wooffers - actually I borrowed them for a day as I am not yet set up to host having no functioning bathroom, kitchen or accommodation to speak of.  I called on Pierre, a local young organic dairy farmer for help with the exterior earth rendering of the house as it was proving rather physically demanding to do it myself what with hauling heavy buckets of earth mixture up a three story scaffolding with just a one wheel pulley.  He offered to come for the day with two young woofers who are currently staying with him.

For those unfamiliar with the term WWoof - it means 'Worldwide Opportunities of organic farms'.  It is a system of exchange whereby volunteers offer commonly 4 to 5 hours of work a day in exchange for accommodation and food.

Sophie and Gina, two young English woofers, were great company and heroically tackled the tasks of mixing up slip and treading a mixture of clay earth, sand and chopped up straw to make the render that we then applied by hand to the east wall of the house.

 Above:  Gina using the drill with bit to mix up a slip of earth and water to apply to the wall before rendering to help it stick.
 Above:  Pierre and Sophie preparing the render of clay earth, sand and chopped straw.
 Above:  Sophie and Pierre brave the rickety scaffolding to apply the render
 Above:  Sophie and Gina putting the finishing touches to the render
 Above:  I think they enjoyed themselves
Above:  The east wall with its lovely new earth render
Above:  Sophie inspects the render
Above:  Sophie quickly mastered the technique of applying the render by hand.
 
Thank you Pierre, Sophie and Gina.

Saturday 10 August 2013

The dry toilet

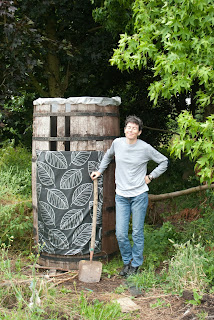
So this house has no toilet or sewage system at the moment.  I have fabricated a temporary dry toilet using one of the old wooden barrels that was originally used as a bird cage.   I got the idea from a neighbour who is an organic cow farmer. I bought a decorative plastic cover to go over the metal grating that is the door and used an old chair that was here, lifted off the seat and bought a plastic bucket that miraculously fitted exactly into it and popped a wooden toilet seat on top.  The roof is covered with a sheet of plastic nailed around the rim:


Above:  Dry toilet in a barrel.

 
Above:  Laura proudly posing next to the dry toilet in a barrel.  The first visitor to happily use it.
 
I initially used sawdust donated by a local saw mill to add to the little gifts left in the bucket but a visiting carpenter pointed out that there was a strong smell of petrol emanating from it.  He explained that there is lot of oil/petrol that would have leaked into it during the sawing process.  What a shame - I had already filled two pallet bays with my contributions and was looking forward to spreading the end result around fruit trees in a few years.  I now get sawdust shavings from this carpenter that has no oil/petrol in it.
 
As a temporary mesure it is quite a novelty but I still haven't got used to emptying the contents into the compost bays (constructed out of palletes stuffed with straw to keep curious animals at bay).  I like the idea of recycling the waste but there must be a more pleasant way of dealing with this .... research to be done ... to be continued.

Tuesday 16 July 2013

Creating a terre paille insulating wall

The Formabois students had completed the onerous task of removing the reinforced concrete that had been applied in a thick render on the north side of the house. They managed to bash out two panels in the space of 5 minutes while it had taken me 3 or 4 days of intermittent work with a breaker (martoburineur) which always leaves me feeling completely exhausted the next morning. Most of the upright wood which supported the torchis underneath had rotted and so I removed them.  The choice for me was either to replace these uprights and re do the torchis or to find another solution.  I opted for the 'terre paille banché' method (a mixture of slip and straw packed into a boarded space) to create an external wall and internal insulation of a thickness of 30cm (any thicker than this and it would not dry with the risk of the straw rotting).

Actually as it turns out, it is a long long tiring process.  Ideally a team of people are required.  The cost is just 2 euros for each bale of hay - otherwise the earth is free - just 'huile de coude' as they say - elbow grease.  My friend Kevin, who is staying here at the moment, and I have got into a rhythm - we do at least an hour every evening.  The pictures below show the process:

 
Above:  I screwed some thin planks into the space which will help to hold the straw and earth mix in place

 
Above:  I used OSB board on either side and using a stick, packed down the straw and slip mixture which had been left to drain on pallets for 24 hours.

 
Above:  Sprinkling the straw onto planks ready to mix with the slip mixture.

Above:  Shovelling earth into the concrete mixer with water to create a slip

Sunday 14 July 2013

Local materials

Where possible I want to use local natural materials that have not been overly processed/transformed.

Above:  My nephews delighting in the huge mounds of earth brought by a neighbour who was doing building work and who had heard that I was in need of material to do torchis.  Where I live, the subsoil is clay.

The hay was already here in the barn when I arrived and I found a local organic farmer who produces organic straw.  I have bought wood to replace beams and battens from the local saw mill who do not treat the wood.

Testing the earth for an exterior render

The east wall of the house was covered in an old lime render that may or may not have had some cement in it.
Above: The old render

At least it was east to remove - unlike the walls on the north side of the house that are thick reinforced concrete.  I replaced some of the horizontal wooden slats that were rotten or missing and then did some tests with the earth, sand and chopped up hay that I found in the barn here to see which combination would work well for a render - it was just a case of filling in areas where there was not enough torchis left. There is not enough space for the traditional lime render of 2cm and in any case I like the natural colour of the earth.


Above:  Top left is pure earth.  I added increasing amounts of fibre across the top and of sand in the vertical plane.  After a few days, there were only two samples that hadn't cracked.

So I decided on a mix of one earth for one sand for one fibre.  Having visited a similar project nearby where the mixture had included chopped up straw, I have decided to do this as well - the bits of straw give an interesting texture and shine - also I will apply it by hand to give a more organic look rather than a smooth flat look that you would get with tools.  So - how to chop up the straw. I have bought a strimmer and I will put straw in a plastic bucket and strim it into pieces.  You can use a chainsaw or lawn mower.  Perhaps I will try them all.
Above:   Before doing the tests, I had mixed up the earth, sand and hay by feel.  I trod the mixture on a plastic sheet before applying it to the wall.


Above:  Applying the mixture to the walls by hand.  I sprayed the wall with water  before starting and also splashed a mixture of slip onto the wall to help the render sticking.

Wednesday 10 July 2013

Inspiraional projects - visited before buying my house

I spent many months working as a wwoofer on organic projects mainly in Normandy and Brittany but also as far away as Perigord in the South of France and Northern Spain as a means of researching ideas for creating my own project and as a way of learning French - an essential prerequisite for living here.

Pedz and Karen - Private Owners - Northern Spain

Pedz and Karen had bought a large woodland in Northern Spain.  Pedz, a green woodworker/yoga teacher had spent the winter in a yurt that he had constructed himself using the wood from his woodland.  He had spent time in the UK honing his skills with Ben Law before moving out to Spain with his partner Karen who had studied environmental science to masters level.  She had become increasingly frustrated with acadaemia and felt it was time to put her ideas and principles into practice.  The idea was to create a permaculture site with yurts, organic gardens and a susainable woodland with the possibility of running courses in the future.  The couple had experimented with communal living in a nearby eco-community but had become increasingly frustrated with the obligatory group meetings and had decided to go it alone.


 Above:  The yurt that Pedz built and the beginnings of a potagerThe open area was covered in brambles when they first arrived.

Above:  The yurt built with chestnut poles and floorboards that were planed from logs from the woodland

Eco- Community owned by Trust in Northern Spain

I then visited an eco-community in the Catalan mountains in Northern Spain where I met a woman who had authored a book 'Handbook for changing the world'.  A fabulous setting with organic gardens, an orchard, a woodland and woodwork studio.  The land had been made available to them by means of a trust set up by two sisters who wanted to support sustainable development projects.  There were working groups for each of the different work areas and decisions were made by consensus.  I detected a hint of cynicism as we were given a quick tour - a reflection of the perhaps inevitable tensions that must arise when groups of people come together to create a shared project.  A visiting group of anarchists had ransacked what was originally an old chapel and the vegan element were lobbying to get rid of the chickens that provided some of the residents with eggs.


Above:  A sauna built by the communards and volunteers using mud and recuperated windows.

 
.Above:  A view over the organic food garden to the foothills beyond

 
Above:  A solar shower built with recuperated and recycled odds and ends

Eco- Community with Private Owner in Perigord, Southern France

Next stop - a sort of community, again inspired by the principles and practices of permaculture, in the Perigord region of the south of France.  The land is owned by someone who was absent at the time of my visit but who had invited/allowed a number of people to settle there.  There was a young woman with seven children who all lived in a yurt.  Her partner had recently run off with a young wwoofer leaving her in a depressed and uncertain state.  There was a lady in her 60s who had spent several years constructing a solid walled yurt and who had invested money in trees and time in the creation of a food garden.  The other members all wanted her to leave as she had become overly grumpy.  There was an assortment of self built huts scattered around the land. 


Above:  Two of the shelters that had been constructed with recycled bits and pieces and materials from the land.

 
 Above:  A wwoofer taking a break from surfing the net.  It was a novel experience for me to be in a place built with recycled materials - a place where there was evidently a lack of money, yet the residents all had computers and regularly surfed the net.

Above:  Raised beds in the food garden.
 
Ferme d'Escures - Environmental Education Centre in Normandy, France
 
An environmental education centre near Vire in Normandy that hosts groups of children who visit for the day to do a range of activities from feeding farm animals to making bread. The owner worked a 20 hour day for little or no financial gain to cook, animate and organise events and visits to the farm.  Memorable events from my time here include learning to harvest and cook with wild plants and helping to implement an educational nature trail.


A visit from 'Formabois'

Shortly after I had contacted the association 'Arpe' (that promotes ecoconstruction in Basse Normandy) to let them know that I was undertaking an ecological renovation, I had a phonecall from a college teacher asking if he could bring a group of students to work with me on the house for a couple of days.  The association are called 'Formabois'.  The students worked to replace a wooden panel at the front of house and learned to prepare a torchis mixture of earth and hay and to apply it to the framework that they had built:

Above:  Two students observe as their teacher levers the beam into place.
 
Above:  Fitting an upright into a mortice.


Above: The shaving horse I made in the UK serves for shaping the pegs to hold the beams in place.


Above:  The students apply the torchis mixture to the wooden panel they had constructed the day before.

Monday 8 July 2013

Maisons de Paysannes de France

Roughly translated as 'Houses of peasants of France'.  An association whose concern is to preserve historic houses.  There are a mountain of associations in France - their British equivalent?  The charity?  I came across this one last year when I was looking to get experience in ecoconstruction in preparation for doing up my house.  They run practical courses at people's properties on a range of subjects from thatching rooves to lime rendering walls.  Together with Monsieur Daniel Herbert, the local representative, we organised a 'torchis' (wattle and daub) course in June this year at my house which I feel was a roaring success.  An eclectic and charming mixture of people turned up including a teenager who discovered a passion for flinging mud at walls, a young wwoofer from Spain and some very tall Dutch men.  They applied the mud and straw torchis mix to the walls with great energy and enthusiasm and managed to do in a morning what we had imagined would take all day.

Above:  Treading the clay earth and hay
 

Above:  The tall Dutch men and a lady prepare to apply the torchis to the wall.

 
Above:  Applying the torchis to the wall.

Meeting the artisans

I have employed artisans to do work that I couldn't have managed myself due to the tools required and/or the heavy nature of the work.


Above:  Stonemasons trimmed the vertical pillars that were rotten at the bottom and placed some sturdy granite under them.  Just in time - a few more years and the house would have started to tilt.
 
 
Above:  A timber framer replaces the rotten beams.  A highly conscientous British artisan - highly health and safety conscious. I've never seen so many powerful tools coming out of one small van.
 
 
Above:  Hammering in the pegs to complete the panel.  Beautifully done.


Sunday 7 July 2013

Starting to work on the house

Ok - ecoconstruction course finished. Now it's time to work on the house and put into practice all that I have learned.

Concrete was considered the new wonder material and was liberally applied to old buildings which has had disastrous effects.  The previous owners of my house put down concrete floors and applied thick reinforced concrete renders to the earth walls.  They also covered the lower wooden beams with concrete which has rotted them to almost nothing in places.  I have spent enormous amounts of time and energy breaking up the concrete in this house.  Concrete doesn't let water vapour pass which results in humidity being trapped in the walls which rots the wood and generally creates humidity.  Concrete floors encourage water from beneath the building to travel sideways and up the house walls.  It all has to go:

 
Above:  Once I had removed the brieze blocks and concrete from under the window, there wasn't much left - the concrete had rotted the beam above the low wall.
 
The picture below shows one of the rooms before I tore everything down.  The polystyrene insulation had created humidity in the walls as had the concrete floor.  The wallpaper was plastic.  I pulled down the ceiling to reveal the wooden beams and the wallpaper and insulation to reveal the earth walls and wooden wall beams which were wet in places.


Above:  This is what this room looked like after breaking up the concrete floor and taking down the polystyrene walls.

Saturday 6 July 2013

Ecoconstruction course

In December 2012, I embarked on a 5 month course in ecoconstruction in Coutances.  I learned about the theory and practice of ecological building.  The theoretical part centred on the notion of the use of natural materials with a low 'energie grise'.  The practical side included stone masonry, earth, lime and plaster renders.

Some images from the course:

Above:  Projecting a lime render.  There are normally 3 coats.  This is the first one.  You need to wear protective glasses and gloves when working with lime.


Above:  Preparing an insulating render of lime and hemp.

 
Above: We spent a week learning how to construct stone walls using lime and earth mortar mixes.

Above:  We learned the theory and practice of three different techniques for the construction of straw bale houses (cellule sous tension, paille porteuse and GREB).  This is 'paille porteuse'.  The straw bales are the supporting walls.  They are held in place by piercing the bales with sticks.

Above:  The highlight of the course was the three weeks we spent working with earth.  Here the architect Francois Streff explains how to make adobe mud bricks with clay earth and straw using wooden moulds.

 
Above:  Building an earth wall (bauge) using clay earth and straw piled onto a base of stones.


Above:  We used a slip of clay earth mixed with straw which was packed down between boards to create an insulating wall.

 
Above:  We carried out a series of tests with different earth to determine the clay content.


Above:  We conducted a series of tests varying the amount of sand and fibre added to a given earth to determine the best combination for an external render for a bauge wall.

 
Above:  We mixed clay earth and straw to make a 'torchis' mix which was pressed around the wooden slats to create an internal wall.

 
Above:  Another 'torchis' method.  A long wound spiral of straw was dipped into slip and then wound in and out of these wooden diagonals to create a wall.

 
Above:  The 'pisé' method of building a wall using gravel and clay earth which is compacted within a boarded space.


Above:  We worked at a centre for renewable energy where we put down an earth floor over a gravel base.

I worked with three different companies during the course.  Marie Meunier is a young 'maconne' in the Perche.  I learned how to mix and apply lime paints with her and also visited an SCIC centre for the promotion of ecoconstruction techniques and materials:

 
Above:  Applying a badigeon de chaux (a lime paint).


Above:  At Ecopertica they had lots of samples of different ecological renders on the walls as well as other ecological building methods.


Above: I worked with Dominique Baffou who imparted his knowledge of ecological paints.

 
Above:  I worked with SARL Letourneur where I learned to mix and apply a lime render to a torchis wall.

 
Above:  Manu Letourneur mixing earth and sand to create test patches for a render.
 
 
Above:  Manu and his pony mixing the earth and hay for a torchis wall.

 
Above:  I helped to create a torchis panel to take to a sustainable development event.

 
Above:  The first stages of a straw bale round house that Manu and his team are building.